
Boots Scouting - If You’re Not Intentional About Something, You’ll Unintentionally Do Nothing
What do all of these pins mean?

As I wrote about in previous weeks, gaining permission to new ground and developing a theory based on my hunting goals of filling my freezer and killing a desired buck (that probably has not seen more than one summer olympics) is part of my annual spring process. Once I have developed a theory based on my e-scouting, it’s time to put boots on the ground to prove (or disprove) my theory. Boot scouting doesn’t mean just going out for a walk in the woods – you have to be intentional about what you’re looking for.
Remember Your Goals
First and foremost, I am going out to boot scout a property with the explicit goal of finding 1-5ish locations to hang a camera this fall. I am taking this 100+ acres of property and funneling it down to the few spots I can quickly scout for the freshest sign. So, instead of spending a bunch of time in the fall (when I don’t have hardly any time) looking for fresh sign, I can go straight to these few spots and determine if it’s worth hanging a camera or not.

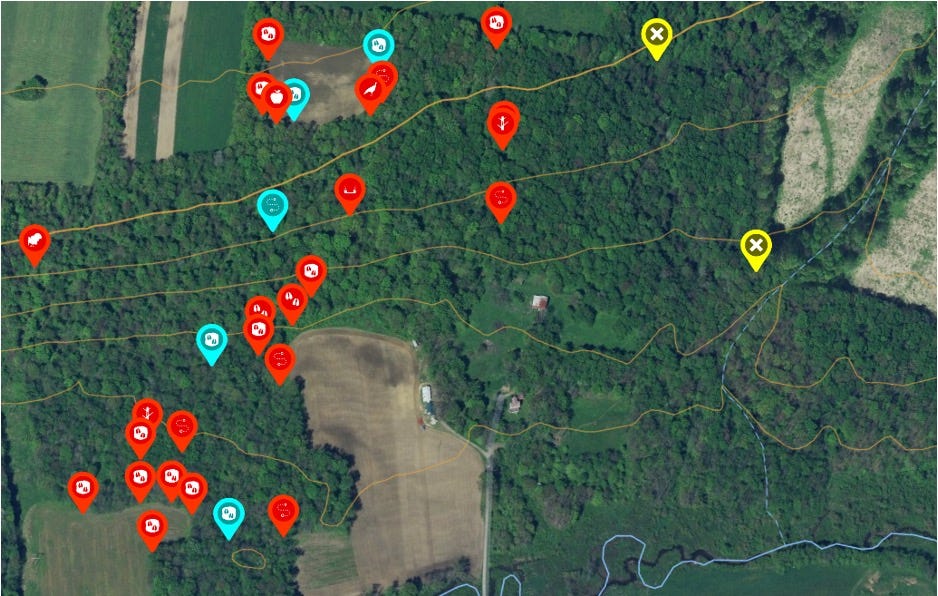
Here’s the e-scouting I did on OnX prior to visiting a new property. Basically, the yellow pins are places I want to visit during my spring scouting to prove my theory of how deer use the hills and valleys.
I break these theories into two categories based on my hunting goals:
Fill the Freezer
With this property, I am fairly confident I know where the ‘kitchens’ are where all of the deer congregate in the evening. There are two food sources of interest: the primary ag field on the bottom of the screen and the small field at the top of the screen. There are also some interesting open cuts in the top-right of the screen. I don’t have permission to hunt the ag fields in the top-left, but it’s good to know they’re over there.
When it comes to killing does, I want to know if the food has a lot of deer tracks in and around it. From there, I’ll determine where the travel comes from to identify the bedding areas. I suspect the bedding areas to be in the hilly, brushy area in the middle of the map. I know they are hills by the topo lines coming close together. I also can guess that it’s a hillside bedding because if it was flat ground, there’s a good chance the farmer would open it up for extra ag acreage. Obviously there are buildings on the map too. I want to see how far away I would need to be for them to not be an impact to me, as well as how I might be able to park and access the property.
Kill a Desired Buck
My theory is that there will definitely be scrapes on the field edges – that will be my place to start when trying to find deer travel routes. I am not generally excited about field-edge scrapes, however. These are good starting areas to backtrack and follow deer paths into the bedding to determine how they travel from the bedroom to the kitchen. The field edge scrapes are nice for getting a general inventory of bucks in the area, but my ideal buck area is
a. A line of scrapes within the cover
b. Between multiple bedding and food sources
c. With multiple rubs leading to and from the scrapes
If I can find this sign all together in one spot, I am definitely going to place a pin to check it out as a possible camera spot in the fall.
Whether I’m looking for bucks or for does, I start in the same place: the valley (a.k.a. the ‘kitchen’). I know all of the deer in the area end up here eventually, albeit usually after dark. That’s ok, I can use this as a starting point and work backwards into different bedding areas to see what kind of deer activity can be found.
After two scouting visits, here’s what my map looks like now (I still have to come back one more time this spring to check out the right-hand side of the property with the remaining yellow pins):
What I Got Wrong
Let’s start with what I got wrong. First, in the bottom-left corner of my previous map, I had a good feeling there would be rut-based sign (rubs and scrapes) down by the creek, since the creek forces deer travel to the field. I saw basically zero deer sign down by the creek, so I wrote it off entirely.
Second, I figured there would be a lot of bedding sign in the hills between the major ag fields. There was some bedding sign, but not nearly as much as I had hoped. In reality, this property looks like it had been logged within the last two years. Normally recent logging of clear cuts is a good thing, with leafy browse regeneration giving a ton of forage for deer. Unfortunately, almost the entire hillside has grown up in briar patches. It is the thickest hillside of briars I have ever seen. It is impassible in most areas, as was proven by the fact that almost no animal trails could be found running through them (and proven by the thorns that would stab me through my clothes for the rest of the day).
Third, I was wrong about my access routes. I thought I could use drainage ditches to travel up and down the hill and avoid being seen by deer. Again, understanding the recent logging and subsequent green up that has occurred, this is just not possible. I found some ways around the area, but it may be worth trying to ask the neighboring land owner if I can have permission to access the property from another direction. I have found that people are much more open to giving you permission if you are just asking to walk through their land instead of hunting on it.
What I Got Right
First, the field-edge scrapes are exactly where you’d think they would be. This is good, because if there aren’t field-edge scrapes, I can pretty much abandon the property as having hardly any deer on it. Interestingly, the largest ag field did not have many field edge scrapes, but since it is closest to the buildings, this makes sense and good to note for future hunting: the deer don’t tend to go near the buildings if they have other options available to them.
Second, I had a hunch the small ag field at the top would be a dynamite spot for sign. It’s tucked away and has easy access for deer from multiple bedding areas. I marked two scrapes in blue as potential camera spots. Even though these are field-edge scrapes, these would be scrapes I would hang a camera to get a good inventory of deer since I believe every deer in the area is going to be in the field and working these scrapes.
What I Found
The most exciting pin I dropped was the blue pin in the middle of the screen. This is one of those buck spots that checked a lot of the rut-cruising boxes I like to see. There were a ton of scrapes. It was clearly a hub of trails coming down from two different bedding areas and going out to two different food sources. This spot got me pumped up to bring a camera back.
There was something bothering me about this spot though. At first I couldn’t put my finger on it. Then it hit me as I took another walk around the scrape area – there were basically zero rubs. What the heck was going on? For the number of scrapes and travel sign here, there should have been at least a few rubbed up trees indicating a buck at least randomly cruised through here at some point during the rut. But there was almost nothing. After going back to my map, I think I counted three rubs total.
That’s a sure sign to pump the brakes on the excitement, at least when it comes to buck sign. I’m still going to come back and hang non-cell cameras in these blue pins, or at least the ones that show promising sign in the fall when I come back. It was a good reminder for me, however, of previous years where I would have just stayed excited about the sign. I would have hung a stand or straight up hunted the spot without any in-season scouting or confirmation that there were deer actually in the area. Essentially, I would have wasted my time.
This brings to mind a quote attributed to one of the founding fathers of modern American archery hunting, Fred Bear: ‘Hunt where the deer actually are, not where you’d imagine them to be.’ As a Basic Hunter, I have come to take this advice as literally as I possibly can. I’ll write more about that topic next week.